meta data de esta página
¡Esta es una revisión vieja del documento!
Utilización
Creación de usuarios, grupos y colas
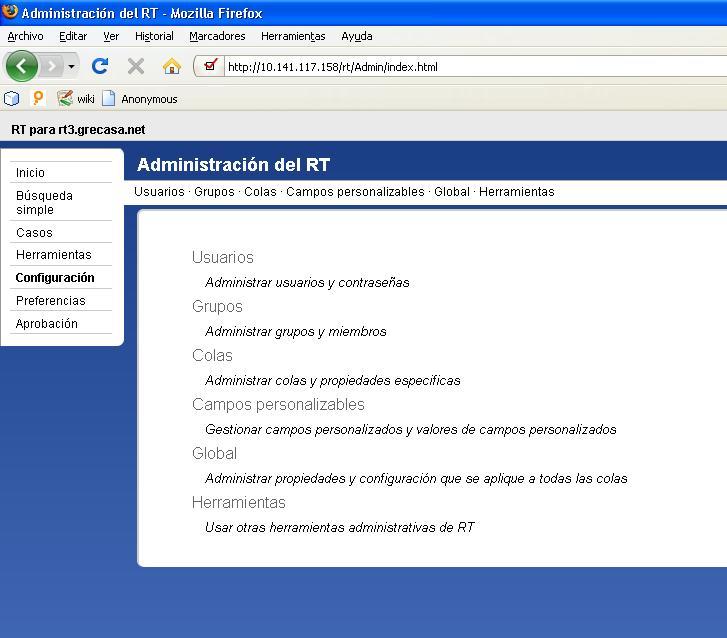
Entramos como root, y nos dirigimos a Configuración, ahí tendremos las subopciones. Entramos en la que queramos y podemos crear, borrar, modificar usuarios/grupos/colas.
Permisos
Cada usuario/grupo tendrá unos permisos determinados sobre una cola. Una cola es como una categoría, una unión de incidencias de un mismo tipo.
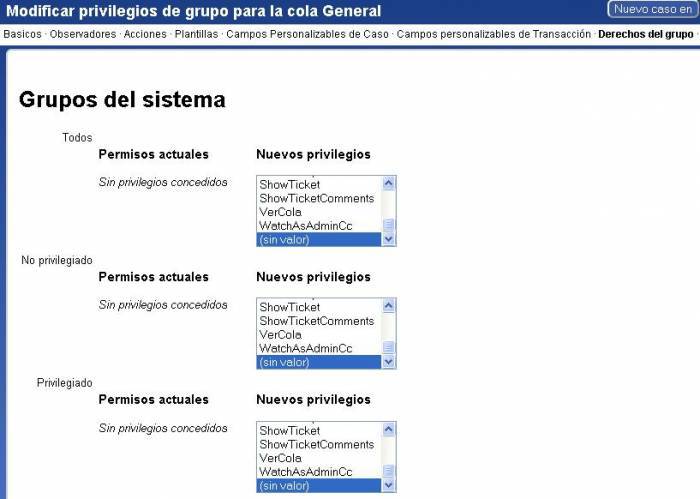
Para modificar los permisos en una cola, vamos a Configuración → Colas → <seleccionas/creas una> → y en el menú superior podremos elegir las diferentes opciones: permisos para usuarios determinados, grupos….
Creación de casos/incidencias
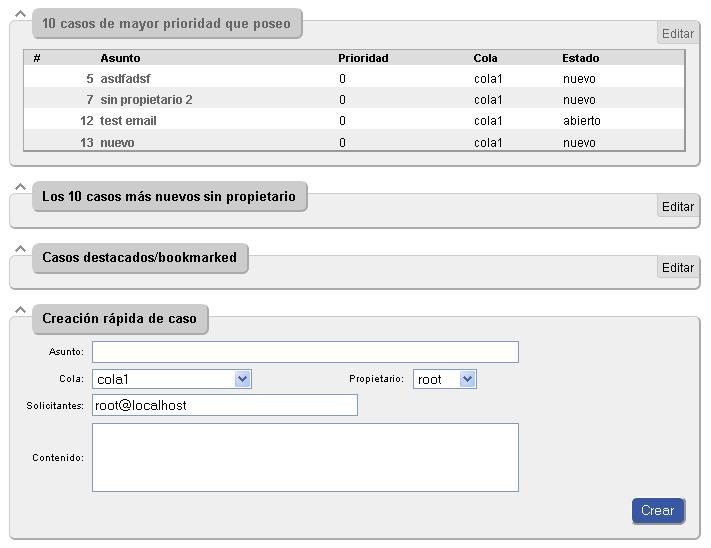
Nada mas entrar como usuario, nos saldrá la pagina principal donde podremos crear una incidencia de forma rápida, ver los casos que tenemos asignados, las colas, etc.
Para crear una incidencia no tendremos mas que rellenar el formulario.
Robar o asignar casos
Si somos los propietarios de un caso, podemos asignarlo a cualquier usuario de nuestro grupo, si tenemos permisos. Lo mismo pasa con robar un caso. La diferencia es que solo podemos asignar caso a otra persona si actualmente nosotros somos el propietario. Y al robar da igual, simplemente debemos tener los permisos necesarios.
Para robar, vamos a alguna incidencia y dentro estará la opción:
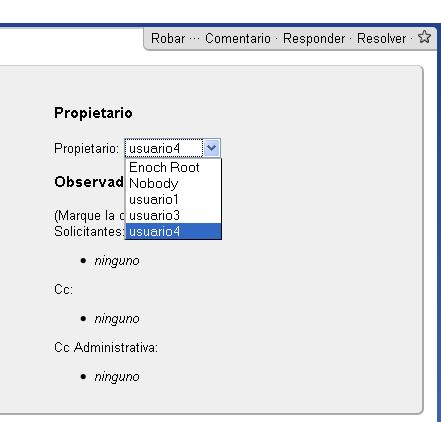
Y para cambiar de propietario, hacemos click en la incidencia y luego en personas. Ahí nos aparecerá la opción:
Aprobaciones en RT
Para hacer una cola que use el sistema de aprobaciones del RT, hay que crear un script (acción) que sea lanzado cuando se crea un ticket.
Definiendo la plantilla
Lo primero que necesitamos es crear una plantilla local a la cola

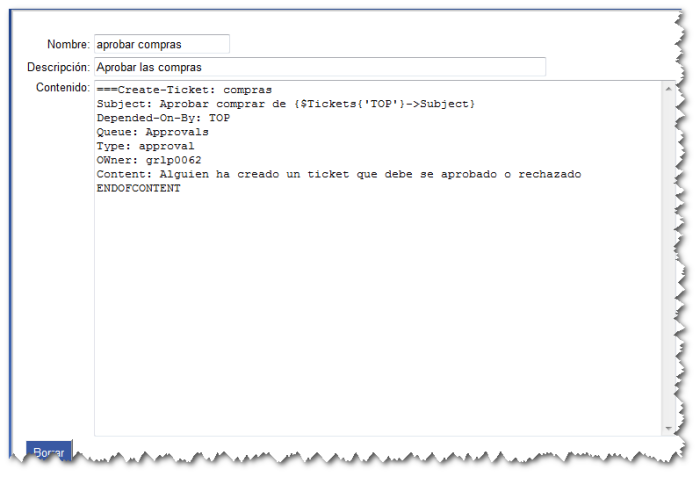
y definir su contenido como esto:
The dependencies between the tickets will force the Approval ticket to be closed before the original ticket can be written off. Approvals Notification And Permissions
If you want different groups of people to have access to different sets of approvals, you will need to set up a few new Queues. No Ticket of type “Approval” will appear in the normal ticket lists, but tickets of this type from any Queue will be shown on the Approvals page. By managing your permissions, you can set up Approval systems for various organisational departments.
Note that if you're using the default _Approvals Queue for your approvals, you'll need to give the people who are to approve things permissions to see tickets in this queue (which you can only do by granting Global permissions.) You'll want to grant ShowTicket to AdminCC's (which ever role your template attaches the approving group to the approval ticket as) Example using PO Requisition Approvals Create a PO-Req queue for PO Requisitions.. this is where the tickets get created which need approval. Enable this queue and add users who are allowed to submit PO Requisitions to this queue with necessary permissions. Create the following template named “Create Approval”: ===Create-Ticket: poreq Subject: Approve purchase order for {$Tickets{'TOP'}→Subject} Depended-On-By: TOP Queue: Approvals-PO Type: approval Owner: username-of-owner #note this is so that notifications work properly Content: Someone has created a purchase requisition. Please review and approve it, so they can spend some money. ENDOFCONTENT If you want multiple approvals, just add more “===Create-Ticket:” sections and the following Scrip: Description: Create PO Req approval Condition: On Create Action: Create Tickets Template: Create Approval Stage: TransactionCreate Create queue Approvals-PO, and copy the templates and scrips from the []Approvals queue. (Leave the [__]Approvals queue disabled and its templates unaltered for future reference). If you want an easy way to copy these templates/scrips.. I have none.. it was copy/paste.
You could do this in Mysql with commands such as:
insert into Scrips (Queue, Description, ScripCondition, ScripAction, ConditionRules, ActionRules, CustomIsApplicableCode, CustomPrepareCode, CustomCommitCode, Stage, Template, Creator, Created, LastUpdatedBy, LastUpdated) select NEWQUEUENUM, Description, ScripCondition, ScripAction, ConditionRules, ActionRules, CustomIsApplicableCode, CustomPrepareCode, CustomCommitCode, Stage, Template, Creator, Created, LastUpdatedBy, LastUpdated from Scrips where Queue=2;
insert into Templates (Queue, Name, Description, Type, Language, TranslationOf, Content, LastUpdated, LastUpdatedBy, Creator, Created) select NEWQUEUENUM, Name, Description, Type, Language, TranslationOf, Content, LastUpdated, LastUpdatedBy, Creator, Created from Templates where Queue=2;
Set the Reply Address and Comment Address to the email address of the “PO-Req” queue. This just makes sense.
Enable this queue and add as AdminCCs the user(s) you wish to be the Approver(s).
In the scrip for “When an approval ticket is created…” change the following condition from User Defined to “On Create”.
The “Approval Passed” Template says “Ticket Rejected” in the subject.. please change to “Ticket Approved”. The “All Approvals Passed” Template says “Ticket Rejected” in the subject.. please change to “Ticket Approved”.
There you have it. Hope this helps. Group Approvals
Sometimes you want to create tickets so that any one person from a group can approve it. One way to do that is as follows:
Create a group that contains the list of users that can approve. In the Approval template, add an AdminCC field. This will contain the group, but you cannot just list the group name, unfortunately; that would just create an unprivileged user with the same name as the group. You have to list the group's Principal ID. I suppose you could find out what that is manually and enter it directly, but that's not very manageable. Instead, put some Perl code in the field as follows:
AdminCC: {
 my $group_name  = 'Group Name';
 my $groups      = RT::Groups->new( $RT::SystemUser );
 $groups->LimitToUserDefinedGroups();
 $groups->Limit(
       'FIELD'    => 'Name',
       'OPERATOR' => '=',
       'VALUE'    => $group_name );
 $groups->First->Id;
}
This inserts the ID of the group named “Group Name” in the AdminCC field. Be sure to replace the group named “Group Name” with the appropriate name of your group.
Now you need to modify permissions for the Queue that contains the Approval so that the AdminCC role can approve it.
Now when you create a ticket with approvals, the approval will show the group name and all of its members in the AdminCC field, and anyone listed there can approve that ticket. If the user that approves it also takes it, then you can easily see in the original ticket's “Depends On” section who approved it. You can automate this via another scrip. Create the following scrip on the Approval queue:
Condition: On Resolve Action: User Defined Template: Global Template: Blank Stage: Transaction Create Custom Action Preparation Code:
my $Actor = $self->TransactionObj->CreatorObj->Id;
if( $Actor != $self->TicketObj->OwnerObj->Id ) {
  $RT::Logger->info("Auto assign ticket #". $self->TicketObj->id ." to user #". $Actor );
  my ($status, $msg) = $self->TicketObj->SetOwner( $Actor );
  unless( $status ) {
    die "Error: $msg";
  }
}
return( 1 );
One of the features of doing it this way is that you can continue to have a single Approval queue and different people can approve different tickets since the rights are based on the AdminCC role and not a specific user or group.


